개인 프로젝트 kfadmin 을 개발하기 위해 로컬 환경 (windows) 에 kubeflow 를 셋업해봤다.
대략 3일간의 삽질 끝에 설치에 성공했다. 이건 그 삽질 기록
목표
Windows 10 Home 노트북에 Kubeflow (kfctl_istio_dex.v1.2.0.yaml) 를 설치한다.
설치 방법
설치 과정은 크게 세 단계로 나뉜다.
- WSL2 셋업 + Ubuntu 설치
- Docker Desktop 설치 및 Kubernetes 설정
- Kubeflow 설치
kubeflow 를 설치하기 위해서는 kfctl 이 필요한데, 이게 윈도우를 지원하지 않는다. 어쩔 수 없이 linux 환경이 필요하다.
마침 WSL 이라는 좋은 서비스가 있다. WSL 을 통해 윈도우에서 Ubuntu 환경을 이용할 수 있으므로 이걸 활용한다.
또한 Docker, Kubernetes 를 사용하기 위해 Docker Desktop 을 설치한다. 처음에는 WSL2 Ubuntu 안에서 cli 로 docker 를 설치하고 minikube 설치하고 이것저것 다 해봤는데 결국 실패했다. 그냥 Docker Desktop 사용하는 게 가장 쉽고 간편하다. 예전에는 Windows10 Home 에서는 Docker desktop 을 사용할 수 없었는데 언제 바뀌었는지 지금은 잘 된다!
최종 설치 버전
- Ubuntu : 18.04 LTS
- Docker : 20.10.2
- Kubernetes, Kubectl : v1.19.3
- Kubeflow : kfctl_istio_dex.v1.2.0.yaml
- kfctl : v1.2.0
최신 Docker Desktop 을 사용해서 Docker, Kuberntes 버전이 최신이다. kubeflow system requirements 를 보면 kubernetes 1.19 버전은 나와있지도 않지만.. 큰 문제없이 작동하는 것을 확인했다.
본격 설치
WSL2 셋업 + Ubuntu 설치
Link 에 설명이 잘 되어있으므로 패스.
Ubuntu 버전은 18.04, 20.04 어떤 것이든 상관없다. 여기서는 18.04 LTS 버전을 사용한다.
Docker Desktop 설치 및 Kubernetes 설정
설치 링크 를 통해 Docker Desktop 을 설치한다.
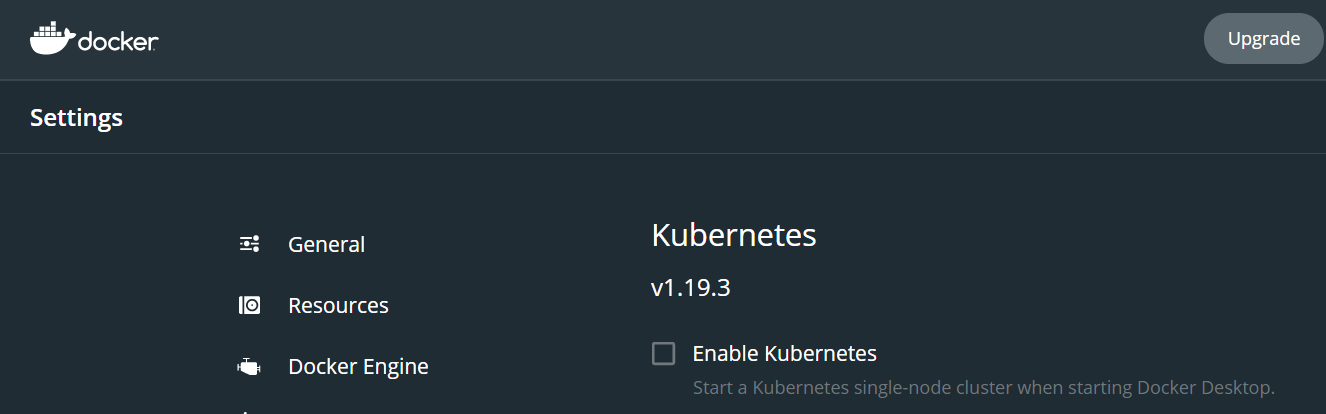
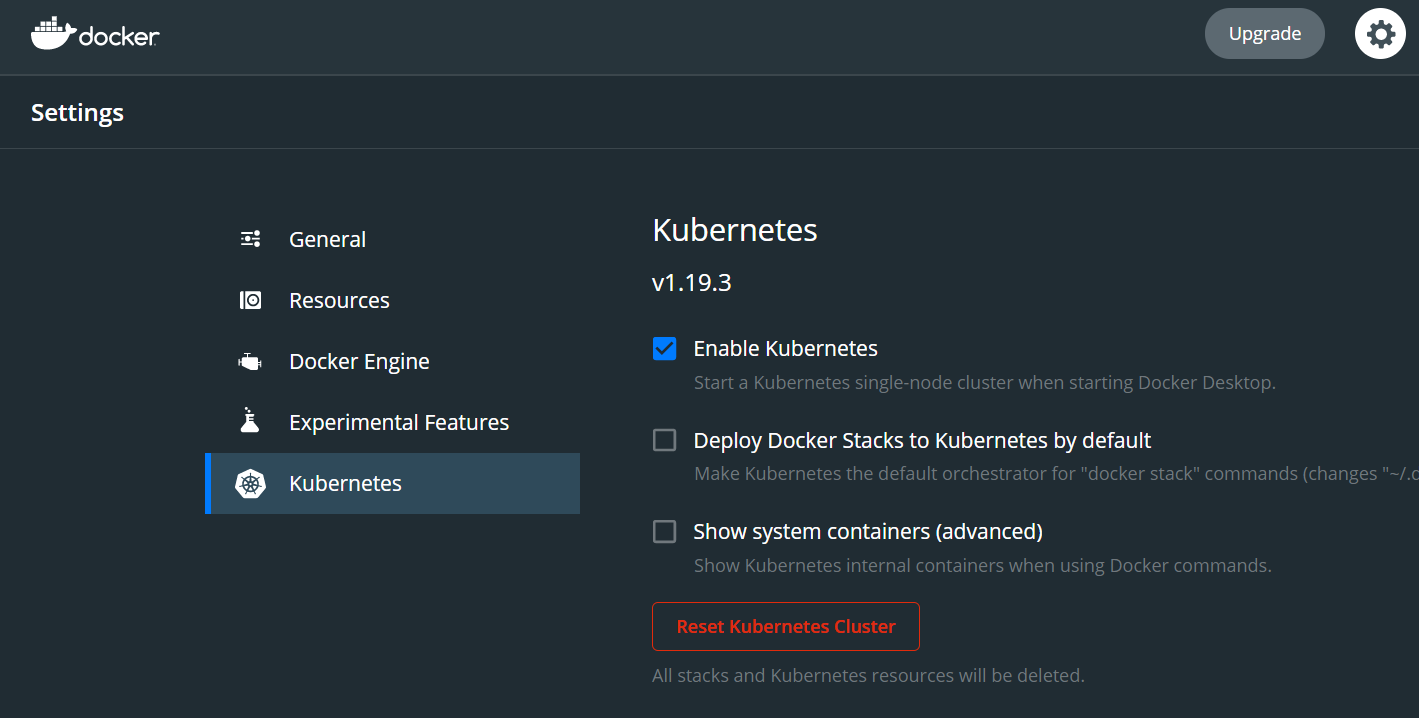
Docker Desktop 을 실행한 후 오른쪽 위 톱니바퀴를 눌러 Settings 로 이동한 후 아래 설정이 켜져 있는지 확인하자.
- General - Use the WSL 2 based engine (Windows Home can only run the WSL 2 backend)
- Kubernetes -> Enable Kubernetes
여기까지 왔으면 Ubuntu 실행 뒤 아래와 같이 docker, kubectl 명령어가 잘 작동하는 것을 확인할 수 있다. (잘 안된다면 재부팅 필요)

Kubernetes 설정 수정
Kubeflow 설치로 넘어가기 전에 Kubernetes 설정을 수정해야 한다. 여길 건너뛰면 Kubeflow 를 설치했을 때 온갖 에러를 만날 수 있다. 에러는 맨 아래 따로 정리해 놓았다. (이 설정을 찾느라 이틀을 날렸다)
kubernetes 의 api server 설정을 수정해야 하는데, 우리는 Docker Desktop 을 통해 Kubernetes 를 사용하고 있어 설정 파일이 로컬에 존재하지 않는다.
honey@WALL-E:~$ cat /etc/kubernetes/manifests/kube-apiserver.yaml
cat: /etc/kubernetes/manifests/kube-apiserver.yaml: No such file or directory
그럼 이 파일을 어떻게 수정하느냐? Stackoverflow 에 나와있다.
honey@WALL-E:~$ docker run -it --privileged --pid=host debian nsenter -t 1 -m -u -n -i sh
/ # vi /etc/kubernetes/manifests/kube-apiserver.yaml
위 명령어를 사용해 Docker 를 실행하면 컨테이너 내부에서 kube-apiserver.yaml 파일을 찾을 수 있다.
이제 vi 로 이 파일을 수정하자.
spec.containers.command 에 많은 argument 가 붙어있는 걸 알 수 있는데, 맨 뒤에 아래 4줄을 추가한다. (참고)
    - --service-account-signing-key-file=/run/config/pki/sa.key
    - --service-account-issuer=kubernetes.default.svc
    - --feature-gates=TokenRequest=true
    - --feature-gates=TokenRequestProjection=true
이때 컨테이너 내부에 /run/config/pki/sa.key 파일이 존재하는지 꼭 확인해보자. 만약 저 경로에 sa.key 파일이 없다면 /etc/kubernetes/pki/sa.key 등에 존재할 수도 있으니 경로에 맞춰 내용을 수정하자.
위 4줄을 추가하면 아래와 같은 yaml 파일이 될 것이다.
apiVersion: v1
kind: Pod
metadata:
  annotations:
    kubeadm.kubernetes.io/kube-apiserver.advertise-address.endpoint: 192.168.65.3:6443
  creationTimestamp: null
  labels:
    component: kube-apiserver
    tier: control-plane
  name: kube-apiserver
  namespace: kube-system
spec:
  containers:
  - command:
    - kube-apiserver
    - --advertise-address=192.168.65.3
    - --allow-privileged=true
    - --authorization-mode=Node,RBAC
    ...
    - --tls-cert-file=/run/config/pki/apiserver.crt
    - --tls-private-key-file=/run/config/pki/apiserver.key
    - --watch-cache=false
    - --service-account-signing-key-file=/run/config/pki/sa.key
    - --service-account-issuer=kubernetes.default.svc
    - --feature-gates=TokenRequest=true
    - --feature-gates=TokenRequestProjection=true
    image: k8s.gcr.io/kube-apiserver:v1.19.3
    ...
파일을 저장하고 컨테이너에서 나오면 자동으로 수정 사항이 적용된다. kubectl get nodes 명령어가 정상적으로 작동하면 잘 적용된 것이다.
이제 Kubeflow 만 설치하면 된다.
Kubeflow 설치
kfctl-istio-dex 를 참고해 진행한다.
설치 준비
kubeflow 를 설치하기 위한 준비물은 다음과 같다.
# Download kfctl

honey@WALL-E:~$ wget https://github.com/kubeflow/kfctl/releases/download/v1.2.0/kfctl_v1.2.0-0-gbc038f9_linux.tar.gz
--2021-01-29 05:36:01--  https://github.com/kubeflow/kfctl/releases/download/v1.2.0/kfctl_v1.2.0-0-gbc038f9_linux.tar.gz
Resolving github.com (github.com)... 15.164.81.167
Connecting to github.com (github.com)|15.164.81.167|:443... connected.
HTTP request sent, awaiting response... 302 Found
...
...
2021-01-29 05:36:50 (627 KB/s) - ‘kfctl_v1.2.0-0-gbc038f9_linux.tar.gz’ saved [31181024/31181024]
honey@WALL-E:~$ tar -xvf kfctl_v1.2.0-0-gbc038f9_linux.tar.gz
./kfctl
honey@WALL-E:~$ export PATH=$PATH:$PWD
honey@WALL-E:~$ kfctl version
kfctl v1.2.0-0-gbc038f9


# Download kfctl_istio_dex.yaml

honey@WALL-E:~$ mkdir kubeflow
honey@WALL-E:~$ cd kubeflow/
honey@WALL-E:~/kubeflow$ export CONFIG_URI="https://raw.githubusercontent.com/kubeflow/manifests/v1.2-branch/kfdef/kfctl_istio_dex.v1.2.0.yaml"
honey@WALL-E:~/kubeflow$ wget -O kfctl_istio_dex.yaml $CONFIG_URI
--2021-01-29 05:41:01--  https://raw.githubusercontent.com/kubeflow/manifests/v1.2-branch/kfdef/kfctl_istio_dex.v1.2.0.yaml
...
...
Saving to: ‘kfctl_istio_dex.yaml’
kfctl_istio_dex.yaml       100%[======================================>]   2.31K  --.-KB/s    in 0.001s
2021-01-29 05:41:01 (1.51 MB/s) - ‘kfctl_istio_dex.yaml’ saved [2369/2369]
honey@WALL-E:~/kubeflow$ ls
kfctl_istio_dex.yaml
Kubeflow 설치
모든 준비가 끝났으니 설치를 시작한다.
honey@WALL-E:~/kubeflow$ kfctl apply -f kfctl_istio_dex.yaml -V
INFO[0000] No name specified in KfDef.Metadata.Name; defaulting to kubeflow based on location of config file: kfctl_istio_dex.yaml.  filename="coordinator/coordinator.go:202"
INFO[0000] Creating directory .cache                     filename="kfconfig/types.go:450"
INFO[0000] Fetching https://github.com/kubeflow/manifests/archive/v1.2.0.tar.gz to .cache/manifests  filename="kfconfig/types.go:498"
INFO[0001] Updating localPath to .cache/manifests/manifests-1.2.0  filename="kfconfig/types.go:569"
INFO[0001] Fetch succeeded; LocalPath .cache/manifests/manifests-1.2.0  filename="kfconfig/types.go:590"
INFO[0001] Processing application: namespaces            filename="kustomize/kustomize.go:569"

...

validatingwebhookconfiguration.admissionregistration.k8s.io/inferenceservice.serving.kubeflow.org created
application.app.k8s.io/kfserving created
certificate.cert-manager.io/serving-cert created
issuer.cert-manager.io/selfsigned-issuer created
INFO[0157] Successfully applied application kfserving    filename="kustomize/kustomize.go:291"
INFO[0157] Applied the configuration Successfully!       filename="cmd/apply.go:75"
honey@WALL-E:~/kubeflow$
설치가 완료되었다. pods 를 한번 살펴보자.
최초 kubeflow 설치 시에는 수많은 docker image 들을 다운로드하여야 하므로 개발 환경에 따라 15분 이상 소요될 수도 있다.
honey@WALL-E:~/kubeflow$ kubectl get pods -n istio-system
NAME                                                         READY   STATUS      RESTARTS   AGE
authservice-0                                                1/1     Running     0          4m17s
cluster-local-gateway-5898bc5c74-n5rhg                       1/1     Running     0          4m41s
istio-citadel-6dffd79d7-sj8d8                                1/1     Running     0          4m42s
istio-galley-77cb9b44dc-4pbjh                                1/1     Running     0          4m42s
istio-ingressgateway-7bb77f89b8-tp766                        1/1     Running     0          4m42s
istio-nodeagent-rvlcp                                        1/1     Running     0          4m42s
istio-pilot-67d94fc954-sg5qq                                 2/2     Running     0          4m42s
istio-policy-546596d4b4-jbnql                                2/2     Running     1          4m42s
istio-security-post-install-release-1.3-latest-daily-nbnxs   0/1     Completed   0          4m42s
istio-sidecar-injector-796b6454d9-gs8gs                      1/1     Running     0          4m42s
istio-telemetry-58f9cd4bf5-j87vb                             2/2     Running     1          4m42s
prometheus-7c6d764c48-xnq7t                                  1/1     Running     0          4m42s

honey@WALL-E:~/kubeflow$ kubectl get pods -n kubeflow
NAME                                                     READY   STATUS             RESTARTS   AGE
admission-webhook-bootstrap-stateful-set-0               1/1     Running            2          4m18s
admission-webhook-deployment-5cd7dc96f5-6zfdj            1/1     Running            0          3m28s
application-controller-stateful-set-0                    1/1     Running            0          4m48s
argo-ui-65df8c7c84-2n9sj                                 1/1     Running            0          4m
cache-deployer-deployment-5f4979f45-ts45p                2/2     Running            4          4m
cache-server-7859fd67f5-z77nc                            2/2     Running            0          3m44s
centraldashboard-67767584dc-cw7sv                        1/1     Running            0          4m
jupyter-web-app-deployment-8486d5ffff-cl4h8              1/1     Running            0          3m59s
katib-controller-7fcc95676b-wvk5v                        1/1     Running            1          3m59s
katib-db-manager-85db457c64-4cmh8                        0/1     Running            3          3m59s
katib-mysql-6c7f7fb869-n4t4c                             0/1     CrashLoopBackOff   4          3m53s
katib-ui-65dc4cf6f5-nmtq5                                1/1     Running            0          3m58s
kfserving-controller-manager-0                           2/2     Running            0          2m15s
kubeflow-pipelines-profile-controller-797fb44db9-2lxqf   1/1     Running            0          3m57s
metacontroller-0                                         1/1     Running            0          4m21s
metadata-db-6dd978c5b-d72lq                              1/1     Running            0          3m57s
metadata-envoy-deployment-67bd5954c-pn26v                1/1     Running            0          3m57s
metadata-grpc-deployment-577c67c96f-txxfn                1/1     Running            4          3m56s
metadata-writer-756dbdd478-vntq7                         2/2     Running            0          3m56s
minio-54d995c97b-dw888                                   1/1     Running            0          3m56s
ml-pipeline-7c56db5db9-8xhfv                             2/2     Running            0          3m55s
ml-pipeline-persistenceagent-d984c9585-npj8s             2/2     Running            0          3m54s
ml-pipeline-scheduledworkflow-5ccf4c9fcc-v2hlt           2/2     Running            0          3m53s
ml-pipeline-ui-7ddcd74489-xbbf8                          2/2     Running            0          3m44s
ml-pipeline-viewer-crd-56c68f6c85-4jcn6                  2/2     Running            4          3m52s
ml-pipeline-visualizationserver-5b9bd8f6bf-f5frb         2/2     Running            0          3m52s
mpi-operator-d5bfb8489-sk872                             1/1     Running            2          3m51s
mxnet-operator-7576d697d6-bb9f5                          1/1     Running            2          3m51s
mysql-74f8f99bc8-mkrvs                                   2/2     Running            0          3m50s
notebook-controller-deployment-5bb6bdbd6d-mhbw5          1/1     Running            0          3m50s
profiles-deployment-56bc5d7dcb-k5h5s                     2/2     Running            0          3m50s
pytorch-operator-847c8d55d8-sc6k2                        1/1     Running            2          3m49s
seldon-controller-manager-6bf8b45656-np9jn               1/1     Running            1          3m49s
spark-operatorsparkoperator-fdfbfd99-wck6n               1/1     Running            0          4m16s
tf-job-operator-58477797f8-6pb8f                         1/1     Running            1          3m48s
workflow-controller-64fd7cffc5-v9czc                     1/1     Running            0          3m47s
honey@WALL-E:~/kubeflow$
(katib-mysql 에 문제가 있어 보이지만 당장 사용할게 아니므로 무시..ㅎㅎ)
istio-ingressgateway 가 잘 떠있으면 Dashboard 에 접근할 수 있다.
우선 port-forward 를 통해 포트를 열어주자.
honey@WALL-E:~/kubeflow$ kubectl port-forward svc/istio-ingressgateway -n istio-system 8080:80
Forwarding from 127.0.0.1:8080 -> 80
Forwarding from [::1]:8080 -> 80
그다음 웹브라우저를 통해 localhost:8080 에 접속하면 다음과 같은 화면이 정상적으로 출력된다!

kfctl_istio_dex.v1.2.0.yaml 파일을 따로 건들지 않았다면 기본 계정은 admin@kubeflow.org 이고, 비밀번호는 12341234 이다. 로그인해보자.

Namespace 생성 화면으로 잘 넘어가는 것을 볼 수 있다!!
마무리
로그인 화면을 띄우는 데까지 3일 동안 삽질을 했다. 나만 그런 건지 모르겠지만 리눅스 서버에 직접 셋업 하거나 GKE, EKS 통해서 셋업 하는 것보다 훨씬 어려웠다..
싱글 노드 클러스터 위에서는 아무래도 Kubeflow 의 모든 기능을 원활하게 사용하긴 어렵겠지만, 나와 같이 테스트용으로 셋업 해보는 분들에게 조금이나마 도움이 되길 바란다.
Troubleshooting
kfctl apply 실행 시 Internal error occurred: failed calling webhook "webhook.cert-manager.io" 발생
kfctl apply 통해 kubeflow 를 설치할 때 아래와 같은 Warning 메세지와 함께 Retry 가 반복되는 현상이 발생할 수 있다.
apiservice.apiregistration.k8s.io/v1beta1.webhook.cert-manager.io unchanged
application.app.k8s.io/cert-manager configured
WARN[0032] Encountered error applying application cert-manager:  (kubeflow.error): Code 500 with message: Apply.Run : error when creating "/tmp/kout752143478": Internal error occurred: failed calling webhook "webhook.cert-manager.io": the server is currently unable to handle the request  filename="kustomize/kustomize.go:284"
WARN[0032] Will retry in 14 seconds.filename="kustomize/kustomize.go:285"
Kubernetes 설정이 제대로 되어있다면 시간이 해결해준다. 다른 구성요소들이 아직 설치 중이어서 발생하는 것 같다. 5분 정도까지 기다린 후 알아서 넘어갔다.
kubeflow 설치 완료 후 istio-ingressgateway 에 문제 : Unable to attach or mount volumes [istio-token]
honey@WALL-E:~/kubeflow$ kubectl describe pod istio-ingressgateway-7bb77f89b8-7rzbd  -n istio-system

...

# case 1
Events:
Type     Reason       Age                    From               Message
----     ------       ----                   ----               -------
Normal   Scheduled    92m                    default-scheduler  Successfully assigned istio-system/istio-ingressgateway-7bb77f89b8-xhh62 to docker-desktop
Warning  FailedMount  92m                    kubelet            MountVolume.SetUp failed for volume "ingressgateway-certs" : failed to sync secret cache: timed out waiting for the condition
Warning  FailedMount  87m (x10 over 92m)     kubelet            MountVolume.SetUp failed for volume "istio-token" : failed to fetch token: the API server does not have TokenRequest endpoints enabled
Warning  FailedMount  87m (x2 over 90m)      kubelet            Unable to attach or mount volumes: unmounted volumes=[istio-token], unattached volumes=[istio-ingressgateway-service-account-token-sl4jj sdsudspath istio-token istio-certs ingressgateway-certs ingressgateway-ca-certs]: timed out waiting for the condition
Normal   Pulling      85m                    kubelet            Pulling image "gcr.io/istio-release/proxyv2:release-1.3-latest-daily"
Normal   Pulled       73m                    kubelet            Successfully pulled image "gcr.io/istio-release/proxyv2:release-1.3-latest-daily" in 11m50.8129591s
Normal   Created      73m                    kubelet            Created container istio-proxy
Normal   Started      73m                    kubelet            Started container istio-proxy
Warning  Unhealthy    13m (x62 over 64m)     kubelet            Readiness probe failed: Get "http://10.1.0.60:15020/healthz/ready": context deadline exceeded (Client.Timeout exceeded while awaiting headers)
Warning  Unhealthy    2m8s (x1257 over 73m)  kubelet            Readiness probe failed: HTTP probe failed with statuscode: 503


...

# case 2
Events:
Type     Reason       Age                  From               Message
----     ------       ----                 ----               -------
Normal   Scheduled    3m29s                default-scheduler  Successfully assigned istio-system/istio-ingressgateway-7bb77f89b8-wl84k to docker-desktop
Warning  FailedMount  3m27s                kubelet            MountVolume.SetUp failed for volume "istio-certs" : failed to sync secret cache: timed out waiting for the condition
Warning  FailedMount  86s                  kubelet            Unable to attach or mount volumes: unmounted volumes=[istio-token], unattached volumes=[istio-certs ingressgateway-certs ingressgateway-ca-certs istio-ingressgateway-service-account-token-jqgww sdsudspath istio-token]: timed out waiting for the condition
Warning  FailedMount  72s (x9 over 3m22s)  kubelet            MountVolume.SetUp failed for volume "istio-token" : failed to fetch token: the API server does not have TokenRequest endpoints enabled
위의 Kubernetes 설정 수정 이 제대로 적용되었는지 다시 확인해보자. 만약 설정이 잘못되어있었다면 설정 수정 후 kfctl delete 명령어로 kubeflow 제거한 후 재설치 필요.
기타 꿀팁
visual studio code(vscode) 를 사용한다면 remote-wsl 이라는 extension 을 통해 마치 로컬 프로젝트를 작업하는 것 처럼 편하게 코드를 수정할 수 있다.
준비물
- windows 에 vscode 설치
- vscode 에서 remote-wsl 또는 remote-development (remote-wsl 을 포함한 더 큰 확장팩 개념) 설치
사용 방법 (참고)
간단하다. 그냥 wsl 에서 작업할 디렉토리로 이동한 후 code . 실행

'개발' 카테고리의 다른 글
| 2023년 8월 CKAD 합격 후기 (0) | 2023.08.17 |
|---|---|
| Kubeflow 1.2 설치 (Ubuntu 21.04 + minikube) (3) | 2021.07.18 |
| Kubeflow 1.3 설치 (Ubuntu 21.04 + minikube) (2) | 2021.07.12 |


댓글